Download Print Friendly Version: English Russian
How to Guide to Printing with Print and Peel
Synopsis...
This simple How to Guide will show you the best way to print with Print and Peel, MacDermid Autotype’s screen printable protective and removable laminate.
Objective – To reliably print with Print and Peel lacquer to create functional laminates with well defined edges, no orange peel, contamination or other faults, which protect the substrate surface, yet are easy to remove cleanly when required.
Recommendations:
Substrates - Although formulated to work with all MacDermid Autotype Polyester and Polycarbonate industrial substrates, Print and Peel may also be used as a temporary protective laminate for printed windows, PVC labels and even gloss graphic inks. Print and Peel may also be used as an edge protector for laser cutting.
Note: Print and Peel maybe difficult to remove from some metal surfaces or matt ink types; full testing prior to use in production is essential.
Autotex Softouch special instructions – Print and Peel will have a high level of mechanical grab when printed onto Softouch. It is therefore advisable to print a high ink film thickness (15µ) if printing onto the textured surface, or if printing onto windows print a butt fit, or even an undersized image.
Frames - It is critical that the mesh releases from the ink film immediately after the squeegee passes, so high tension stretching (> 20N/cm) onto a rigid metal frame is required. Autotype 2-Part Screen Adhesive will hold the high mesh tensions that are required and will not slip when exposed to Autosolve cleaning solvents.
Mesh - Always choose a high quality monofilament polyester mesh for Print and Peel printing, as variations in weave quality can show up in the print. Select a mesh from 30–70/cm depending on the film thickness required. A finer mesh may be used, however the laminate may end up too thin to be functional and also difficult to remove.
It is critical that the mesh is totally clean and free from all ghost images before the stencil is made. Contamination in the mesh will lead to poor ink flow and variations in the printed laminate. Always use Universal Mesh Prep or Auto Degreaser Concentrate to ensure the best stencil adhesion possible and use Autokleen Plus to remove any mesh staining if the screen has been used before.
Stencils - Print and Peel images are typically block images, so stencil resolution is not critical, however to create a cleanly defined edge a high quality water resistant emulsion such as PLUS 7000 is perfect. The universal resistance of PLUS 7000 means that it can be used for graphics and circuitry printing as well.
Multi-coating PLUS 7000 to create a flat (low Rz) stencil will greatly improve the print definition and help the clean peel/removal of the laminate. A rough (high Rz) stencil will create a saw-toothed print which will tear easily on peeling and potentially leave ‘witness marks’ on the substrate.
Printing – Print and Peel is supplied press-ready, however if further thinning is required then up to 5% additional water can be added. Always use distilled water to prevent contamination. Print using a 65-75 shore, square section Polyurethane squeegee set at an angle of 70°–85° to reduce air bubbles. Print at a low pressure and slow speed (20–30cms/second) for best results.
To reduce drying in and improve printability, a heavy flood stroke is recommended. Air bubble generation during printing can be more of a problem when using a coarse mesh, a slow squeegee speed is required to minimise bubble generation.
A dried ink film thickness of 6–15µ is recommended. A thin ink thickness is harder to remove especially on ‘high grab’ surfaces such as Autotex Softouch. To obtain a thick, high quality print, it is often better to print two thinner layers of Print and Peel rather than just one thick layer.
How to minimise dust contamination
Dust is impossible to remove from the dried print, therefore prevention is always better than contamination!
- Remove any contamination from the dry screen prior to printing with a low tack roller
- If the print room is not a ‘clean room’, then create a cleaner environment around the press by curtaining. This will also enable you to increase the relative humidity (RH) to reduce static build up during printing. An extractor hood will be required for local exhaust
- The operators should wear clean room clothing
- Always clean the substrate prior to printing using a low tack roller or machine
- Try to restrict personnel movement in the area during printing
- Place tack mats around the press
- Cover the screen during stoppages or remove the lacquer
- Never return unused lacquer to the pot
Drying – Print and Peel should be dried in a jet air dryer at 80–90°C for 1–2 minutes. This ink is water based so drying will be influenced by the RH. Print and Peel should dry to a tack free finish that will not block, stick or offset when the prints are stacked.
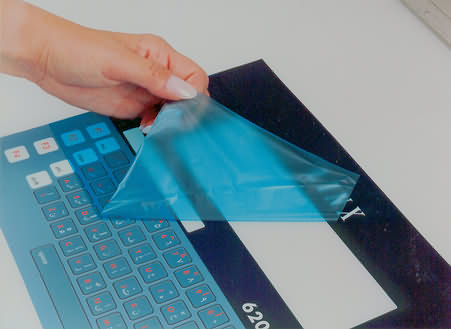
Removing the laminate – The laminates should be easy to remove by lifting a corner with your fingernail or if desired a low tack tape can be used to lift it. However prolonged exposure to temperatures greater than 90°C and/or exposure to high intensity UV may increase the adhesion to some substrates.
Cleaning - press wash: If the screen needs to be cleaned during printing use water and allow the mesh to dry out completely before recommencing printing.
Cleaning - archiving: If the screen is to be archived for reuse, the screen can be cleaned with warm water, paying particular attention not to damage the wet stencil.
Cleaning - decoating: If the stencil is to be decoated, use Autosolve Aqua 2 which is a water dilutable, water washable screen cleaning solvent.
Stencil removal - Ghost images in the mesh can cause shadow marks in the print, therefore to get the best results use Autostrip stencil stripper followed by Autokleen Plus, low caustic haze remover.
Our range of products for printing perfect printed removable laminates
|
Printable lacquer |
Print and Peel |
|
Hard coated films |
Autotex and Autoflex |
|
Mesh adhesive |
2-Part Screen Adhesive |
|
Mesh degreasers |
Universal Mesh Prep & Auto Degreaser Concentrate |
|
Photostencil emulsions |
PLUS 7000 |
|
Screen wash solvents |
Autosolve Aqua 2 |
|
Stencil stripper |
Autostrip |
|
Haze remover |
Autokleen Plus |


